Solutions
Device management
Remotely manage, and protect laptops and mobile devices.
Orchestration
Automate tasks across devices, from app installs to scripts.
Software management
Inventory, patch, and manage installed software.
Infrastructure as code
See every change, undo any error, repeat every success.
Extend Fleet
Integrate your favorite tools with Fleet.
Customers
Pricing
More
Device management
Remotely manage, and protect laptops and mobile devices.
Orchestration
Automate tasks across devices, from app installs to scripts.
Software management
Inventory, patch, and manage installed software.
Infrastructure as code
See every change, undo any error, repeat every success.
Extend Fleet
Integrate your favorite tools with Fleet.
Deploy CrowdStrike with Fleet
{{articleSubtitle}}
Harrison Ravazzolo
Deploy CrowdStrike with Fleet
{{articleSubtitle}}
Harrison Ravazzolo
Deploy CrowdStrike Falcon with Fleet
This guide will cover how to deploy CrowdStrike Falcon on macOS, Linux and Windows using Fleet. It includes:
- Installing the CrowdStrike Falcon application
- Creating a post-install script to collect the CrowdStrike Customer ID for activation
- Deploying required application configurations
Install options to consider before you start
Install CrowdStrike Falcon during Fleet End User Setup Experience
It is considered a best practice to install CrowdStrike Falcon when hosts first enroll into Fleet as part of the provisioning process. Learn how:
Use GitOps to install CrowdStrike Falcon
If your organization is using Fleet GitOps and you want to pass the CrowdStrike site key as a secret, follow this guide: https://fleetdm.com/guides/secrets-in-scripts-and-configuration-profiles.
Dedicated CrowdStrike Falcon osquery table
Starting with fleetd version 1.50, you can use the crowdstrike_falcon osquery table to check the status of a CrowdStrike Falcon installation on macOS and Linux.
Download the CrowdStrike Falcon installer
On the CrowdStrike Falcon dashboard, click the hamburger menu in the top-left corner of the page, then navigate to Host setup and management > Sensor Downloads (in the Deploy section of the menu).
Select the appropriate Falcon Sensor package for your platform and copy the Customer ID string found in the How to install sidebar on the right side of the page. The Customer ID must be collected during the CrowdStrike Falcon installation to activate the Falcon application on a host.
For Windows, CrowdStrike offers
.exeand.msiFalcon installers. Selecting the.msipackage is preferable because it performs a silent, fully-automated installation when using the Automatic install option in Fleet.
macOS CrowdStrike Falcon installation
1. Deploy configuration profiles
CrowdStrike Falcon requires multiple .mobileconfig payloads on macOS.
The payloads can be combined and delivered as a single Configuration Profile, or, delivered in separate Configuration Profiles for modularity and easier reading.
Below is an explanation of what each of the macOS CrowdStrike Falcon payloads does:
crowdstrike-service-management.mobileconfig- Configure Falcon as a managed login item so its services can't be stopped by end users.crowdstrike-notification.mobileconfig- Suppress notifications to reduce end user notification fatigue. (This is a best practice for many fully-managed applications.)crowdstrike-system-extension- Install the CrowdStrike Falcon System Extension to allow all necessary application entitlements and access to the macOS kernel.crowdstrike-web-filter.mobileconfig- Enable web filtering to monitor network traffic at the socket level.crowdstrike-full-disk-access.mobileconfig- Grant full disk access to all CrowdStrike application processes using the CrowdStrike Apple Developer team identifier.
Download the CrowdStrike Falcon macOS Configuration Profiles
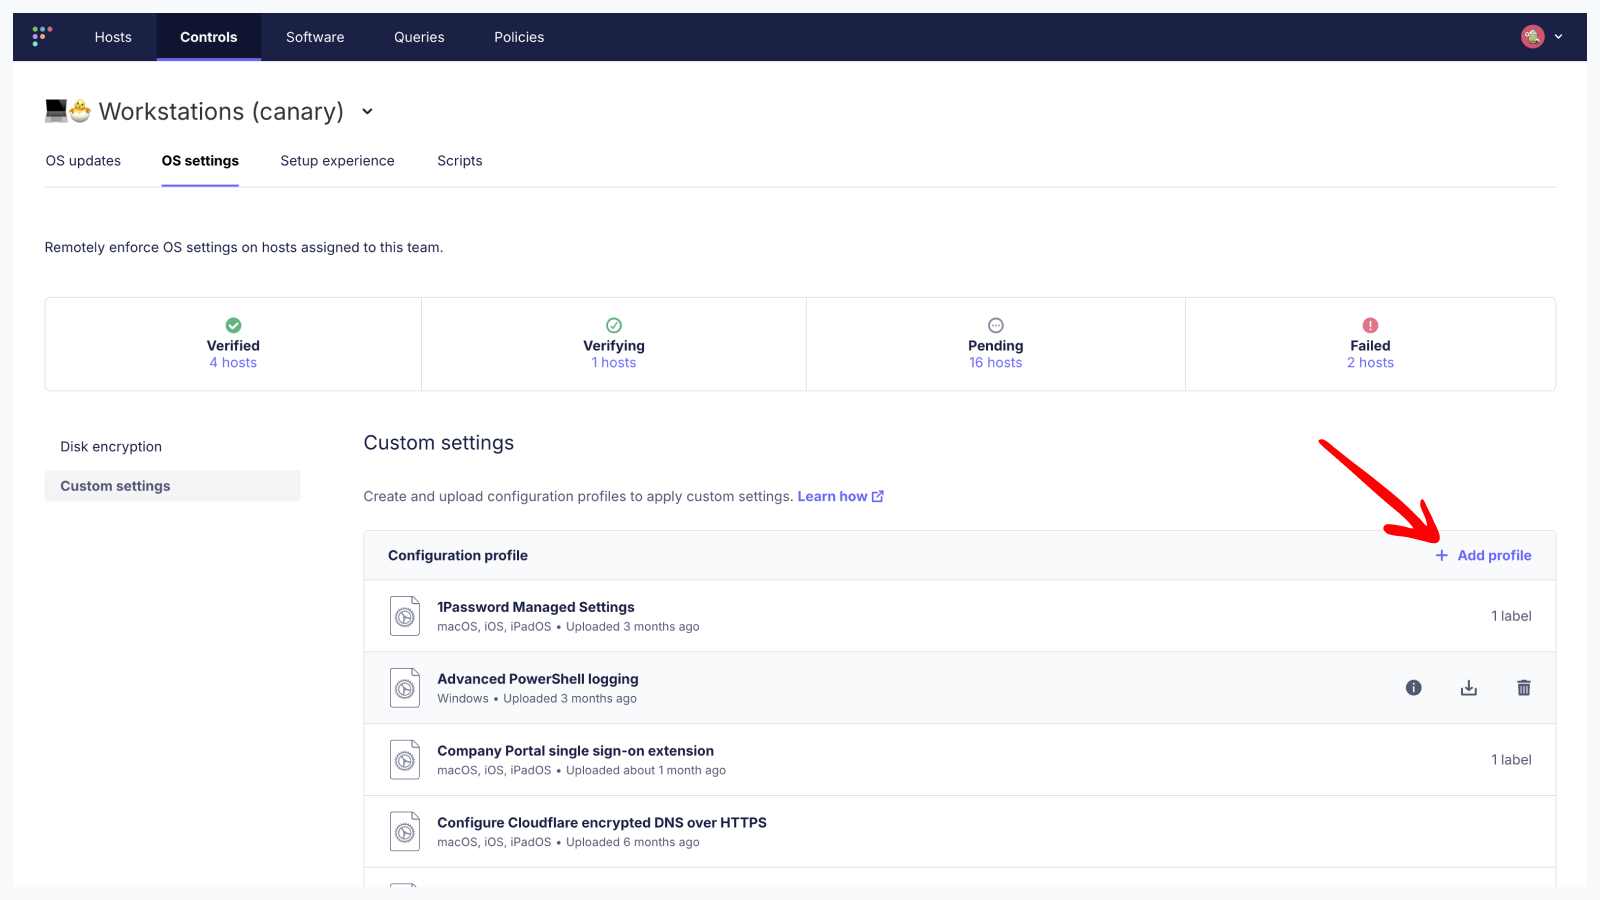
To upload Configuration Profiles to your Fleet instance: go to Controls > OS Settings > Custom settings then click Add Profile.
2. Create a post-install script
To activate a host in the CrowdStrike tenant, a script must be excuted after CrowdStrike Falcon is installed to collect the Customer ID. Use this script on macOS with the Customer ID string copied from your CrowdStrike tenant above:
#!/bin/bash
CUSTOMER_ID="YOUR-CUSTOMER-ID-HERE"
FALCON_PATH="/Applications/Falcon.app/Contents/Resources/falconctl"

sudo "$FALCON_PATH" license "$CUSTOMER_ID"

# Check status
if [ $? -eq 0 ]; then
    echo "Activation completed"
else
    echo "Activation failed"
    exit 1
fi
3. Add the Falcon Sensor to your software library
- In Fleet, go to Software > Add software > Custom package to upload the Falcon Sensor installer.
- Click Advanced options, then paste the activation script from the previous step into Post-install script, making sure to set the
CUSTOMER_IDvariable.
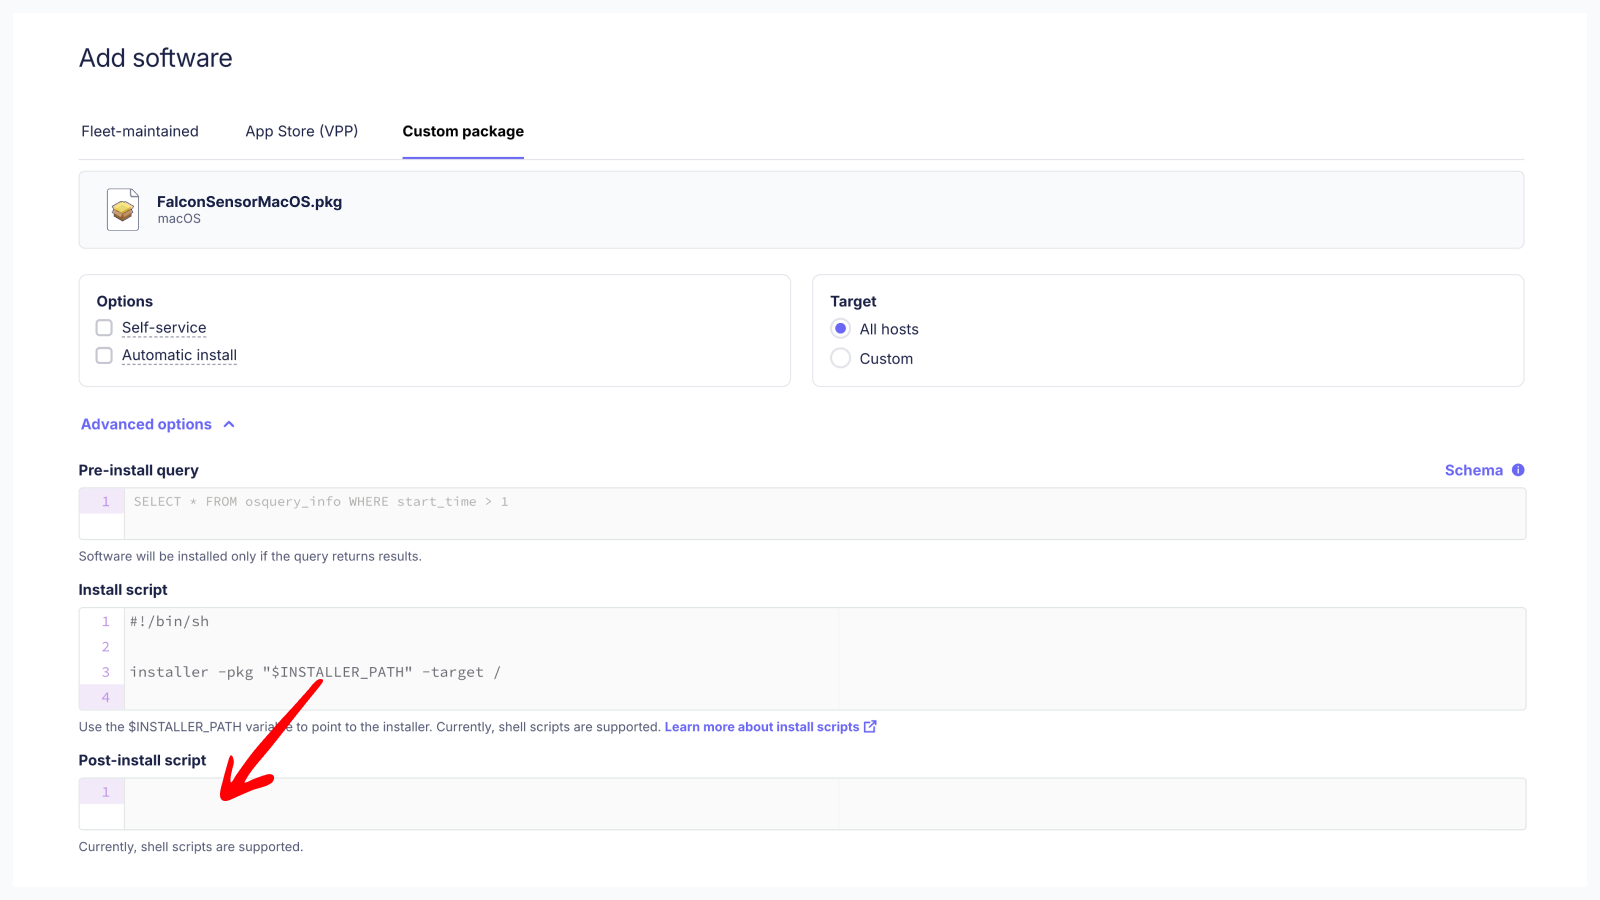
- Click Add software.
Linux CrowdStrike Falcon installation
1. Create a post-install script
To activate a host in the CrowdStrike tenant, a script must be excuted after CrowdStrike Falcon is installed to collect the Customer ID. Use this script on Linux with the Customer ID string copied from your CrowdStrike tenant above:
#!/bin/bash
CUSTOMER_ID="YOUR-CUSTOMER-ID-HERE"

# Set the Customer ID
sudo /opt/CrowdStrike/falconctl -s --cid="$CUSTOMER_ID"

if [ $? -eq 0 ]; then
    echo "Activation completed"
else
    echo "Activation failed"
    exit 1
fi
CrowdStrike provides documentation for additional flags you can use here.
2. Add the Falcon Sensor to your software library
- In Fleet, go to Software > Add software > Custom package to upload the Falcon Sensor installer.
- Click Advanced options, then paste the activation script from the previous step into Post-install script, making sure to set the
CUSTOMER_IDvariable.
You can use labels to scope installations for different hardware architectures.
- Click Add software.
Windows CrowdStrike Falcon installation
1. Create a post-install script
To activate a host in the CrowdStrike tenant, a script must be excuted after CrowdStrike Falcon is installed to collect the Customer ID. Use this script on Windows with the Customer ID string copied from your CrowdStrike tenant above:
# Set your Customer ID here
$FalconCid = "YOUR-CUSTOMER-ID-HERE"

$logFile = "${env:TEMP}/fleet-install-software.log"
try {
$installProcess = Start-Process msiexec.exe `
  -ArgumentList "/quiet /norestart /lv ${logFile} /i `"${env:INSTALLER_PATH}`" CID=${FalconCid}" `
  -PassThru -Verb RunAs -Wait
Get-Content $logFile -Tail 500
Exit $installProcess.ExitCode
} catch {
  Write-Host "Error: $_"
  Exit 1
}
CrowdStrike provides documentation for additional flags here.
2. Add the Falcon Sensor to your software library
- In Fleet, go to Software > Add software > Custom package to upload the Falcon Sensor installer.
- Click Advanced options, then paste the activation script from the previous step into Post-install script, making sure to set the
$FalconCidvariable. - Click Add software.
Conclusion
Fleet offers admins a straight-forward approach to deploying the CrowdStrike Falcon application across your macOS, Linux and Windows hosts. See https://fleetdm.com/guides/deploy-software-packages for more information on installing software packages using Fleet.