Solutions
Device management
Remotely manage, and protect laptops and mobile devices.
Orchestration
Automate tasks across devices, from app installs to scripts.
Software management
Inventory, patch, and manage installed software.
Infrastructure as code
See every change, undo any error, repeat every success.
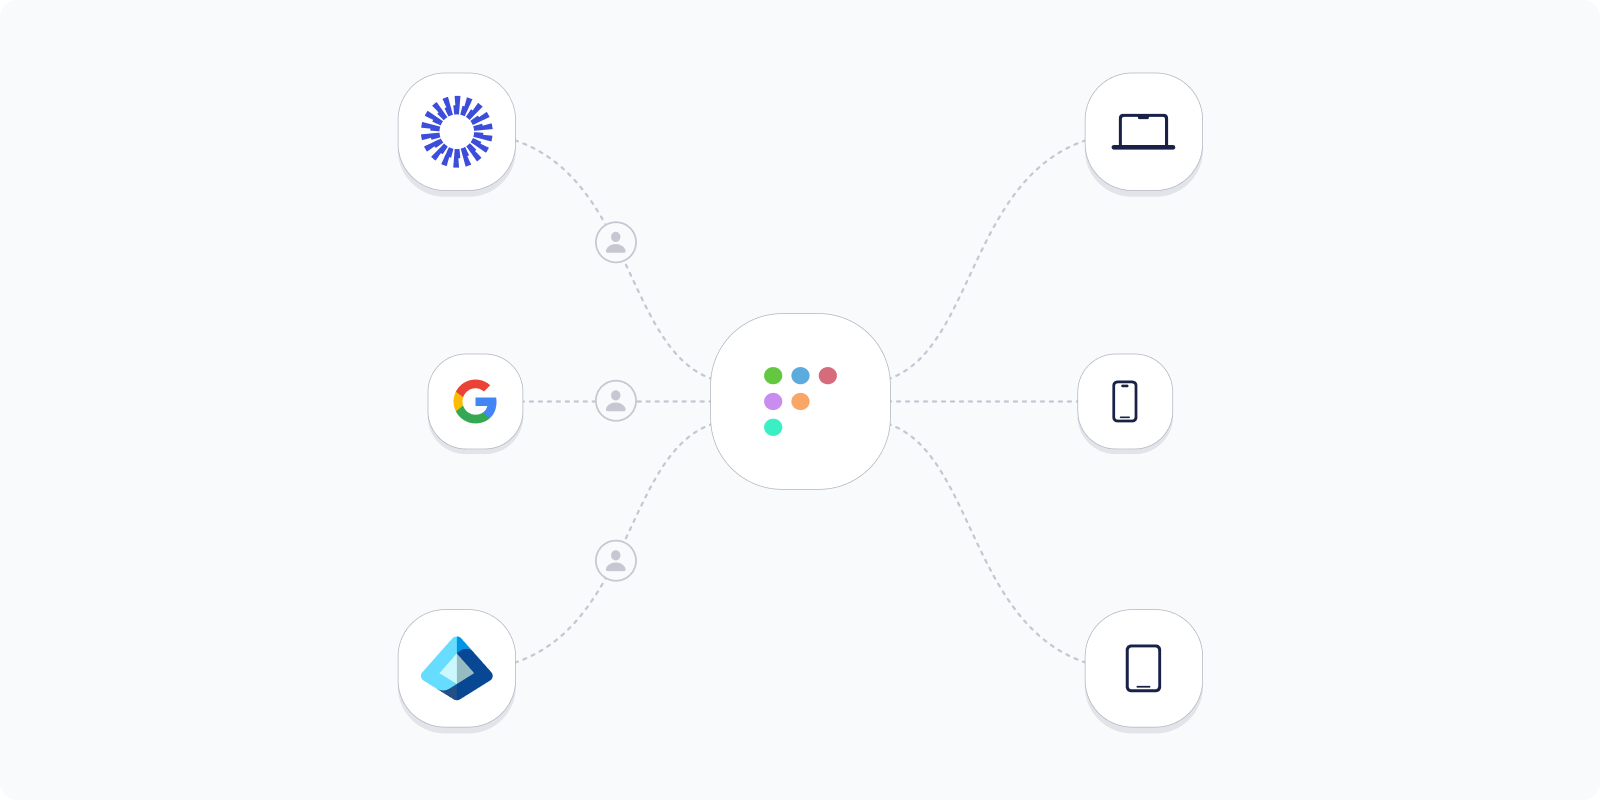
Extend Fleet
Integrate your favorite tools with Fleet.
Customers
Pricing
More
Device management
Remotely manage, and protect laptops and mobile devices.
Orchestration
Automate tasks across devices, from app installs to scripts.
Software management
Inventory, patch, and manage installed software.
Infrastructure as code
See every change, undo any error, repeat every success.
Extend Fleet
Integrate your favorite tools with Fleet.
Foreign vitals: map IdP users to hosts
{{articleSubtitle}}
Marko Lisica
Foreign vitals: map IdP users to hosts
{{articleSubtitle}}
Marko Lisica
Foreign host vitals: Identity provider (IdP) username, groups, and department
Available in Fleet Premium.
Fleet can map an end user's IdP username, groups, and department to their host(s) in Fleet. Then, you can use these IdP host vitals as variables in configuration profiles or criteria for labels.
Fleet supports Okta, Microsoft Active Directory (AD) / Entra ID, Google Workspace, authentik, as well as any other IdP that supports the SCIM (System for Cross-domain Identity Management) protocol.
Fleet automatically collects IdP host vitals when an end user authenticates during these enrollment scenarios:
- Automatic enrollment (ADE) for Apple (macOS, iOS, iPadOS) hosts.
- Manual enrollment for personal (BYOD) iOS, iPadOS, Android, and Windows hosts.
You can also manually add/update a host's IdP username on the Host details page. Fleet will then automatically map the username to other IdP vitals.
Okta
To map users from Okta to hosts in Fleet, we'll do the following steps:
Step 1: Create application in Okta
- Head to Okta admin dashboard.
- In the main menu, select Applications > Applications, then select Create App Integration.
- Select SAML 2.0 option and select Next.
- On the General Settings page, add a friendly App name (e.g Fleet SCIM), and select Next.
- On the SAML Settings page, add any fully-qualified URL to the Single sign-on URL and Audience URI (SP Entity ID) fields, and select Next.

Okta requires setting up SAML to set up SCIM. Since we don't need SAML right now, you can set the URL to something arbitrary, e.g "https://example.fleetdm.com".
- On the Feedback page, provide feedback if you want, and select Finish.
- Select the General tab in your newly created app and then select Edit in App Settings.
- For Provisioning, select SCIM and select Save.
Step 2: Connect Okta to Fleet
- Select the Provisioning tab and then, in SCIM Connection, select Edit.
- For the SCIM connector base URL, enter
https://<your_fleet_server_url>/api/v1/fleet/scim. - For the Unique identifier field for users, enter
userName. - For the Supported provisioning actions, select Push New Users, Push Profile Updates, and Push Groups.
- For the Authentication Mode, select HTTP Header.
- Create a Fleet API-only user with maintainer permissions and copy API token for that user. Paste your API token in Okta's Authorization field.
For example,
fleetctl user create --name 'SCIM User' --email '[email protected]' --password 'hunter2' --api-only --global-role maintainer
- Select the Test Connector Configuration button. You should see a success message pop up in Okta. You can close this message.
- In Fleet, head to Settings > Integrations > Identity provider (IdP) and verify that Fleet successfully received the request from Okta.
- Back in Okta, select Save.
- Under the Provisioning tab, select To App and then select Edit in the Provisioning to App section. Enable Create Users, Update User Attributes, Deactivate Users, and then select Save.
- On the same page, make sure that
givenNameandfamilyNameattributes have Okta values assigned to them. Currently, Fleet requires theuserName,givenName, andfamilyNameSCIM attributes. Fleet also supports thedepartmentattribute, but does not require it. Delete the rest of the attributes.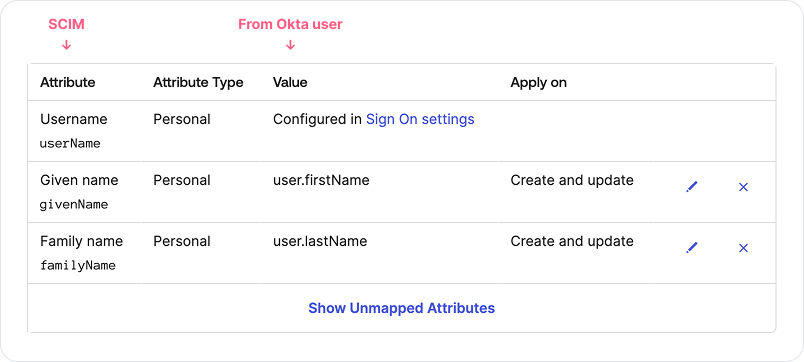
Step 3: Map Okta users and groups to hosts in Fleet
To send users and groups information to Fleet, you have to assign them to your new SCIM app.
- In Okta's main menu Directory > Groups and then select Add group. Name it "Fleet human-device mapping".
- On the same page, select the Rules tab. Select Add Rule to create a rule that will assign users to your "Fleet human-device mapping" group.
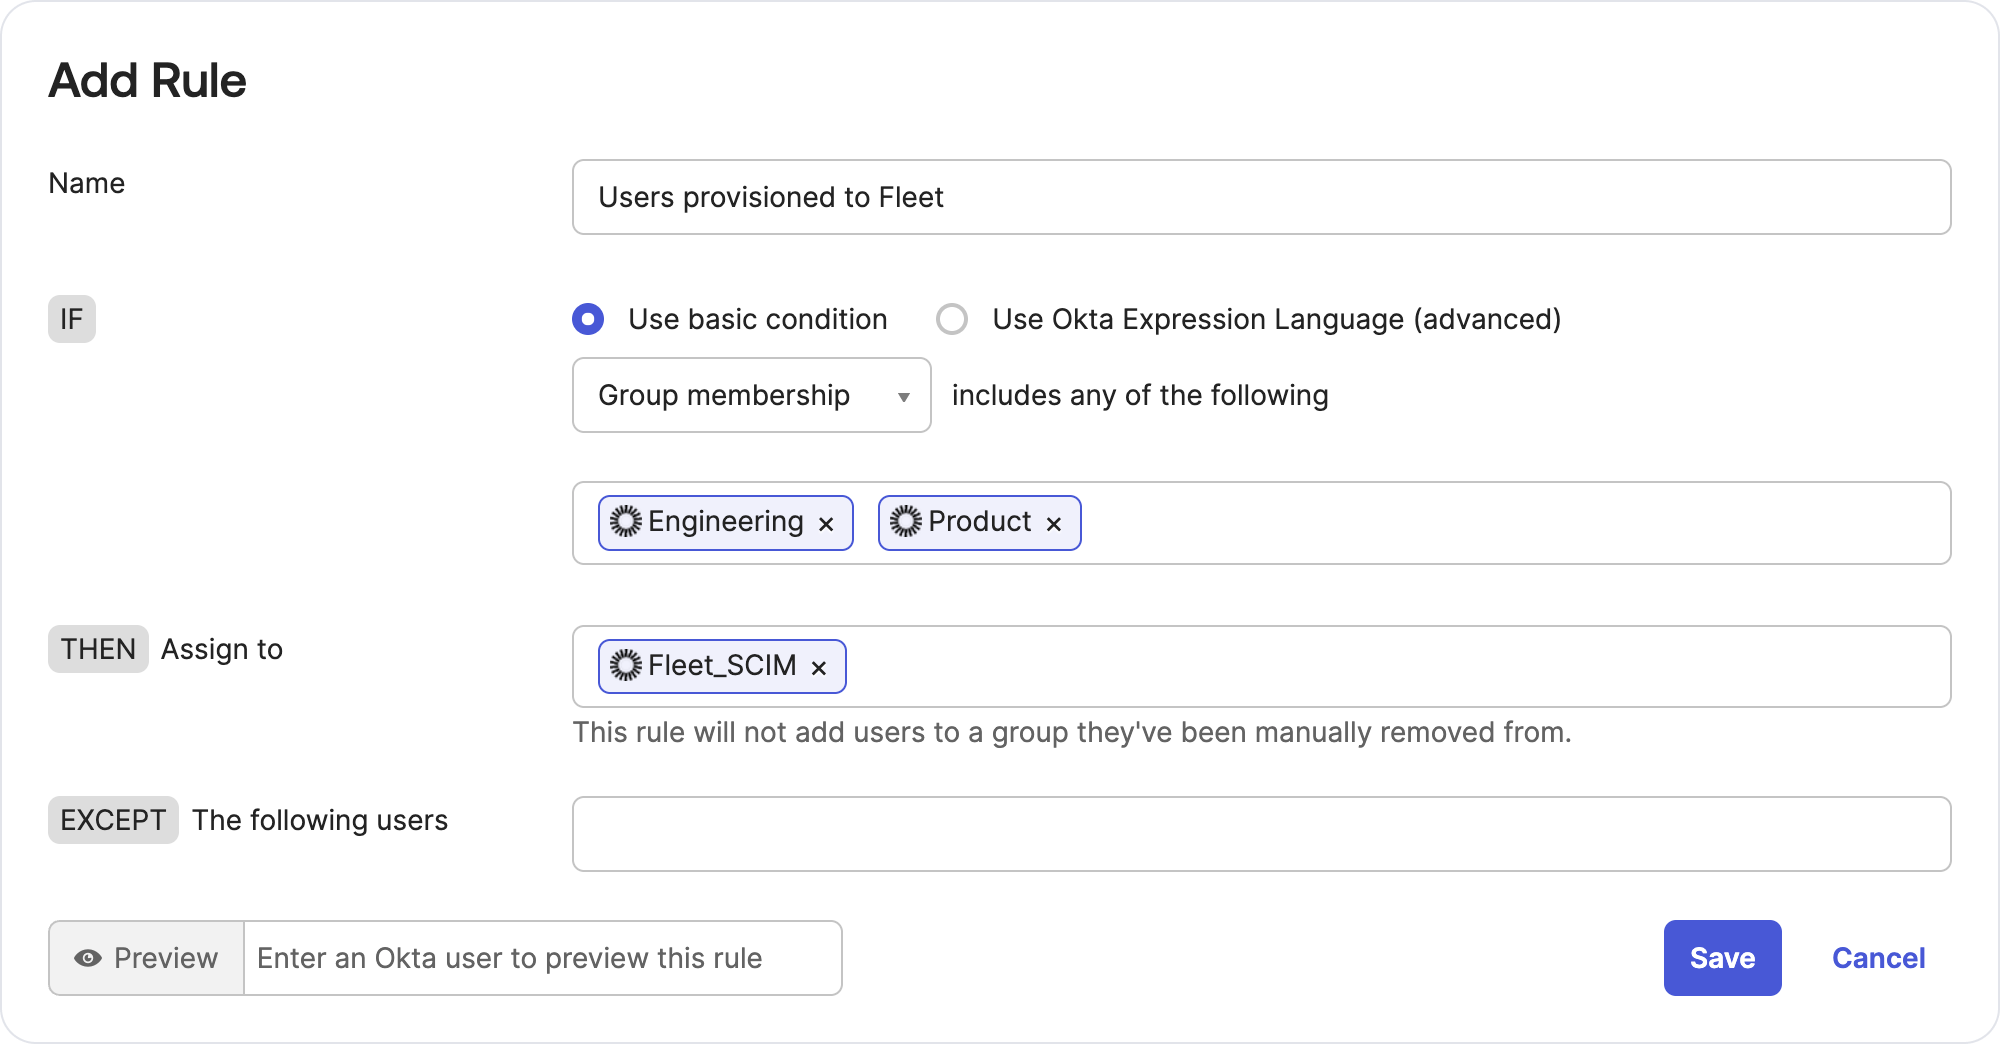
- After saving your new rule, select Activate from the Actions menu to populate users into the human-device mapping group.
- In the Okta main menu, select Applications > Applications and select your new SCIM app. Then, select the Assignments tab.
- Select Assign > Assign to Groups and then select Assign next to the "Fleet human-device mapping" group, then Save and Go Back, then Done. Now all users that you assigned to the "Fleet human-device mapping" group will be provisioned to Fleet.
- On the same page, select the Push Groups tab. Then, select Push Groups > Find groups by name and add all groups that you assigned to "Fleet human-device mapping" group previously (make sure that Push group memberships immediately is selected). All groups will be provisioned in Fleet, and Fleet will map those groups to users.
Troubleshooting
If you find that identity information (e.g full name or groups) is missing on the host, and the host has an IdP username assigned to it:
- In Okta, select Directory > People, find the affected user, and make sure that it has all the fields required by Fleet (username, first name, and last name).
- If all required fields are present, then go to Applications > Applications, select your app, then go to the Provisioning tab and select To App. Scroll to the bottom of the page and make sure that
userName,givenName, andfamilyNamehave a value assigned to them. - Otherwise, make sure that all settings from the instructions above were set correctly.
Microsoft Entra ID
To map users from Entra ID to hosts in Fleet, we'll do the following steps:
- Create enterprise application in Entra ID
- Connect Entra ID to Fleet
- Map Entra users and groups to hosts in Fleet
Step 1: Create enterprise application in Entra ID
- Head to Microsoft Entra.
- In the main menu, select Applications > Enterprise applications. Then, select + New application and +Create your own application.
- Add a friendly name for the app (e.g. Fleet SCIM), select Integrate any other application you don't find in the gallery (Non-gallery), and select Create.
Step 2: Connect Entra ID to Fleet
- From the side menu, select Provisioning.
- In Get started with application provisioning section, select Connect your application.
- For the Tenant URL, enter
https://<your_fleet_server_url>/api/v1/fleet/scim?aadOptscim062020. - Create a Fleet API-only user with maintainer permissions and copy API token for that user. Paste your API token in the Secret token field.
- Select the Test connection button. You should see success message.
- Select Create and, after successful creation, you'll be redirected to the overview page.
Step 3: Map Entra users and groups to hosts in Fleet
- From the side menu, select Attribute mapping and then select Provision Microsoft Entra ID Groups.
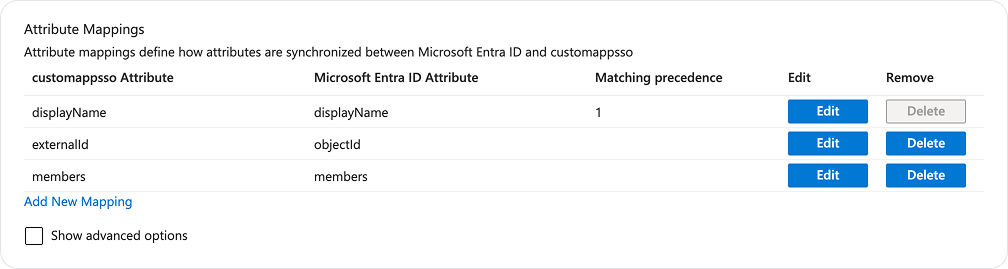
- Select Provision Microsoft Entra ID Users.
- Ensure that the attributes
userName,givenName,familyName,department,active, andexternalIdare mapped to Microsoft Entra ID Attribute. Currently, Fleet requires theuserNamegivenName, andfamilyNameSCIM attributes. Delete the rest of the attributes. Then, elect Save and select the close icon in the top right corner.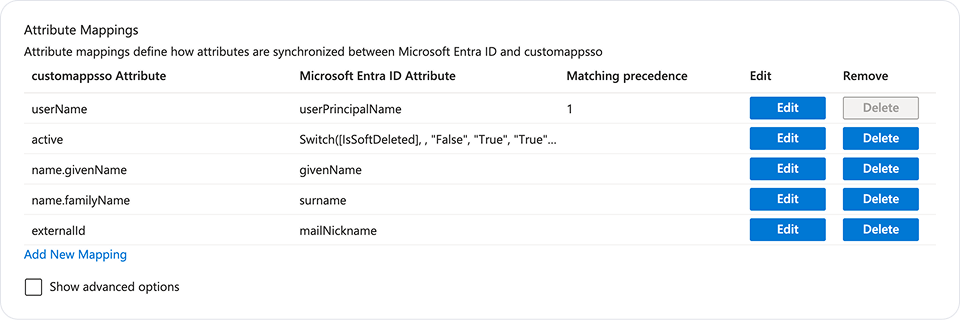
- Next, from the side menu, select Users and groups , + Add user/group, and None Selected.
- Select the users and groups that you want to map to hosts in Fleet and then select Assign.
- From the side menu, select Overview and select Start provisioning.
It might take up to 40 minutes until Microsoft Entra ID sends data to Fleet. To speed this up, you can use the "Provision on demand" option in Microsoft Entra ID.
Google Workspace
Google Workspace doesn't natively support the SCIM standard. The best practice is to export users to authentik. Authentik then adds users to Fleet.
Prerequisites
- Install and run authentik
- Google Workspace Business Plus plan (or one of the plans listed in Google Secure LDAP article)
Connect
To map users from Google Workspace to hosts in Fleet, we'll do the following steps:
- Add LDAP client in Google Admin console
- Add LDAP authentication certificate to authentik
- Add custom LDAP property mappings to authentik
- Configure LDAP connection in authentik
- Map users and groups to hosts in Fleet
Step 1: Add LDAP client in Google Admin console
- Head to the Google Admin console.
- From the side menu, select Apps > LDAP.
- Select ADD CLIENT, add a friendly name (e.g. "authentik") and description, and then select CONTINUE.
- Select Entire domain in Verify user credentials and Read user information sections.
- Toggle the switch under Read group information to On and select ADD LDAP CLIENT.
- Select Download certificate and select CONTINUE TO CLIENT DETAILS.
- Select Authentication card and select GENERATE NEW CREDENTIALS.
- Save Username and Password. We'll need those along with a certificate we'll download in the next section.
Step 2: Add LDAP authentication certificate to authentik
- Navigate to your authentik admin dashboard.
- From the side menu, select System > Certificates.
- Select Create and add a friendly name (e.g. "Google LDAP certificate").
- Now, find the downloaded certificate on your computer and unarchive it. Then, open the
.crtwith a text editor (e.g. TextEdit), copy its contents, and paste into the Certificate field. - Open the
.keyfile with a text editor and copy its content to the Private key field. Then, select Create.
Step 3: Add custom LDAP property mappings to authentik
- In authentik's side menu, select Customization > Property Mappings,
- Select Create and LDAP Source Property Mapping from the list. Then, select Next.
- You need to repeat this a few times and add each of these property mappings:
Name: Google LDAP objectSid > ldap_uniq
Expression:
return { "attributes": { "ldap_uniq": list_flatten(ldap.get("objectSid")), }, }Name: Google LDAP mail > username
Expression:
return { "username": list_flatten(ldap.get("mail")), }Name: Google LDAP mail > email
Expression:
return { "email": list_flatten(ldap.get("mail")), }Name: Google LDAP givenName > givenName
Expression:
return { "attributes": { "givenName": list_flatten(ldap.get("givenName")), }, }Name: Google LDAP sn > familyName
Expression:
return { "attributes": { "familyName": list_flatten(ldap.get("sn")), }, }Name: Google LDAP displayName > name
Expression:
return { "name": list_flatten(ldap.get("displayName")), }Name: Google LDAP displayName > name (group)
Expression:
return { "name": list_flatten(ldap.get("displayName")), }Name: Google LDAP objectSid > ldap_uniq (group)
Expression:
return {
    "attributes": {
        "ldap_uniq": list_flatten(ldap.get("objectSid")),
    },
}
Step 4: Configure LDAP connection in authentik
- From the side menu, select Directory > Federation and Social login.
- Select Create, LDAP Source, and Next.
- Add a friendly name (e.g. "Google LDAP").
- Make sure that Enable, Sync users and Sync groups are toggled on.
- In the Server URL enter
ldap://ldap.google.com. For more information, refer to Google docs. - For the TLS client authentication certificate, select your certificate created in 2nd section (Google LDAP certificate)
- For the Bind CN, enter the username that you saved in the first step. For Bind Password, enter the password you saved.
- In Base DN, enter your Google Workspace domain in a DN format (e.g. dc=yourcompany,dc=com).
- For the User Property Mappings, remove all selected properties by clicking the "X" icon, and select all user properties that we created in the left box and select the ">" icon between boxes.
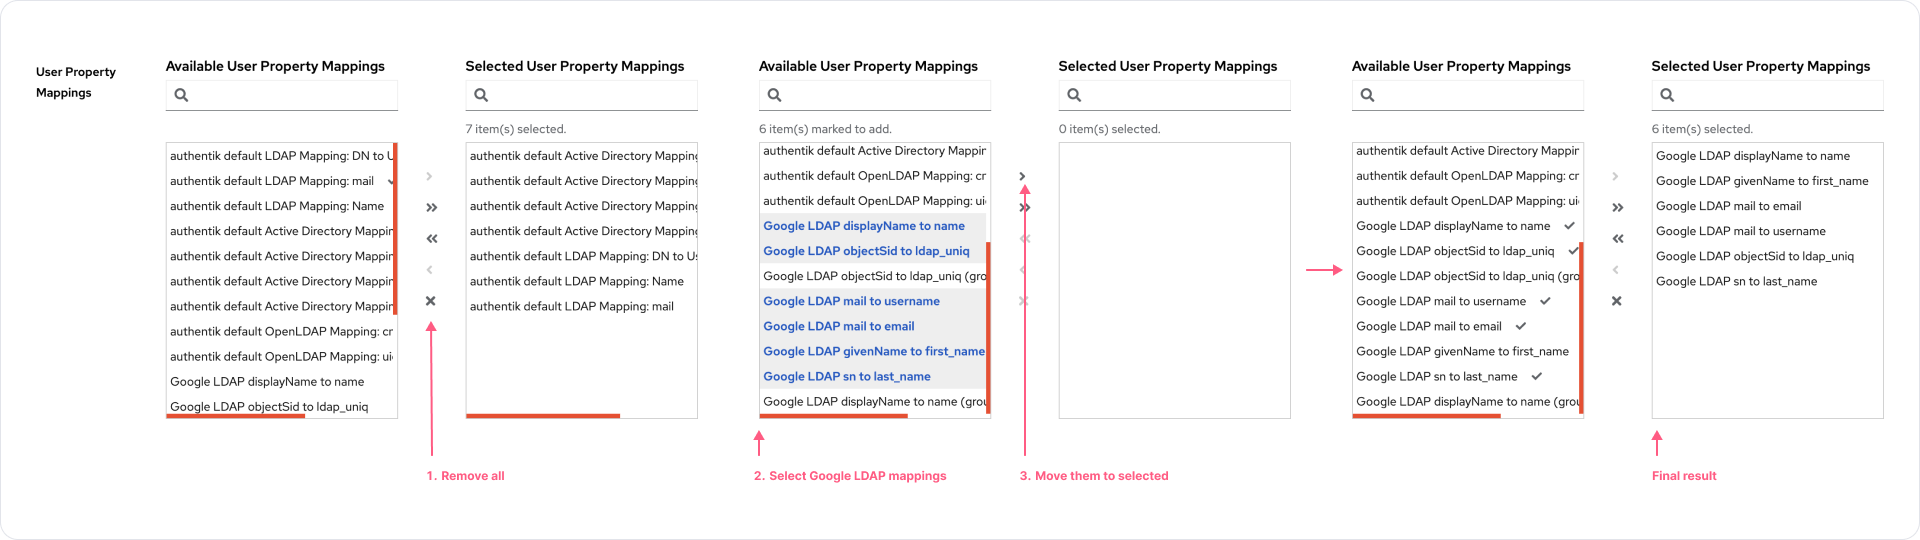
- For the Group Property Mappings, remove all selected properties by clicking the "X" icon, and select all group properties that we created in the left box and select the ">" icon between boxes.

- Under Additional settings, enter values below:
- User object filter >
(objectClass=person) - Group object filter >
(objectClass= groupOfNames) - Group membership field >
member - Object uniqueness field >
objectSid
- User object filter >
- Select Finish to save your configuration.
- After a few minutes, on the Directory > Users page, you should see users from your Google Workspace.
Step 5: Map users to hosts in Fleet
- From the side menu, select Applications > Providers, Create, SCIM Provider, and then Next.
- Add a friendly name (e.g. "Fleet SCIM provider").
- For the URL, enter
https://<your_fleet_server_url>/api/v1/fleet/scim. - Create a Fleet API-only user with maintainer permissions and copy the API token for that user. Paste your API token in the Token field.
- Select Finish to save provider.
- Now, from the side menu, select Applications > Applications. Then, select Create.
- Add a friendly name (e.g. "Fleet SCIM app") and slug (e.g. "fleet-scim-app").
- For the Backchannel Providers, select the provider created above ("Fleet SCIM provider").
- Select Create to add the application.
- After a few minutes, you should see users mapped to hosts in Fleet.
Other IdPs
IdPs generally require a Fleet SCIM URL and API token:
- SCIM URL -
https://<your_fleet_server_url>/api/v1/fleet/scim - API token - Create a Fleet API-only user with maintainer permissions and copy API token for that user.
Fleet requires the userName, givenName, and familyName SCIM attributes. Make sure these attributes are correctly mapped in your IdP with userName as the unique identifier. Fleet uses the userName attribute to map to IdP groups and department.
Fleet also supports the department attribute. Delete all other attributes.
To map groups, configure your IdP to provision (push) them to Fleet.
Verify connection
After following the steps above, you should be able to see the latest requests from your IdP to Fleet if you navigate to Settings > Integrations > Identity Provider (IdP).
To verify that user information is added to a host, go to the host that has an IdP username assigned and verify that Full name (IdP), Department (IdP), and Groups (IdP) are populated correctly.
Syncing users
When SCIM is configured with your IdP, Fleet automatically deletes a user’s Fleet account when the user is deleted or deactivated in the IdP.
If the user is later reactivated in the IdP, Fleet will automatically recreate the account on the user’s next SSO login, as long as Create user and sync permissions on login in Settings > Integrations > Single sign-on (SSO) is enabled
No manual intervention is required. This applies only to SSO-authenticated users. API-only and password-authenticated users are not affected.