Solutions
Device management
Remotely manage, and protect laptops and mobile devices.
Orchestration
Automate tasks across devices, from app installs to scripts.
Software management
Inventory, patch, and manage installed software.
Infrastructure as code
See every change, undo any error, repeat every success.
Extend Fleet
Integrate your favorite tools with Fleet.
Customers
Pricing
More
Device management
Remotely manage, and protect laptops and mobile devices.
Orchestration
Automate tasks across devices, from app installs to scripts.
Software management
Inventory, patch, and manage installed software.
Infrastructure as code
See every change, undo any error, repeat every success.
Extend Fleet
Integrate your favorite tools with Fleet.
Setup experience
{{articleSubtitle}}
Noah Talerman
Setup experience
{{articleSubtitle}}
Noah Talerman
Setup experience
Available in Fleet Premium
In Fleet, you can customize the out-of-the-box macOS, Windows, Linux, iOS, iPadOS, and Android setup.
This guide covers macOS, iOS, iPadOS, and Android. Learn more about Windows and Linux in a separate guide.
macOS setup features require connecting Fleet to Apple Business Manager (ABM).
If a host is marked with a migration deadline in Apple Business Manager, Fleet treats it as already set up. This means Fleet won’t install setup experience software, run scripts, or install bootstrap packages on that host.
Below is the end user experience for macOS. Check out the separate videos for iOS, iPadOS, and Android.
End user authentication
You can enforce end user authentication during automatic enrollment (ADE) for Apple (macOS, iOS, iPadOS) hosts and manual enrollment for personal (BYOD) iOS, iPadOS, and Android hosts. End user authentication is also supported on Windows and Linux. End users can use passkeys, such as YubiKeys, with macOS hosts during the authentication process.
Create a new SAML app in your IdP. In your new app, use
https://<your_fleet_url>/api/v1/fleet/mdm/sso/callbackfor the SSO URL. If this URL is set incorrectly, end users won't be able to enroll. On iOS hosts, they'll see a "This screen size is not supported yet" error message.In your new SAML app, set Name ID to email (required). Fleet will trim this email and use it to populate and lock the macOS local account Account Name. For example, a "johndoe@example.com" email will turn into a "johndoe" account name.
If the host is restarted during automatic enrollment (DEP), the macOS local account fields won't be populated with the user's IDP email and username.
Make sure your end users' full names are set to one of the following attributes (depends on IdP):
name,displayname,cn,urn:oid:2.5.4.3, orhttp://schemas.xmlsoap.org/ws/2005/05/identity/claims/name. Fleet will automatically populate and lock the macOS local account Full Name with any of these.In Fleet, configure your IdP by heading to Settings > Integrations > Single sign-on (SSO) > End users. Then, enable end user authentication by heading to Controls > Setup experience > End user authentication. Alternatively, you can use Fleet's GitOps workflow to configure your IdP integration and enable end user authentication.
If you've already configured single sign-on (SSO) in Fleet, you still want to create a new SAML app for end user authentication. This way, only Fleet users can log in to Fleet.
End user license agreement (EULA)
To require a EULA, in Fleet, head to Settings > Integrations > MDM > End user license agreement (EULA) or use the Fleet API.
Currently, a custom EULA is only supported for macOS hosts.
Bootstrap package
Fleet supports installing a bootstrap package on macOS hosts that automatically enroll to Fleet. Apple requires that your package is a distribution package. You can install software during out-of-the-box Windows and Linux setup. Learn more in this separate guide.
This enables installing tools like Puppet, Munki, or Chef for configuration management and/or running custom scripts and installing tools like DEP notify to customize the setup experience for your end users.
Fleet's agent (fleetd) is also installed during MDM migration and when the enrollment profile is renewed manually by running sudo profiles renew -type enrollment. If you manually install fleetd, fleetd won't be installed.
The following are examples of what some organizations deploy using a bootstrap package:
Munki client to install and keep software up to date on your Macs
Puppet agent to run custom scripts on your Macs
Custom scripts and several packages bundled into one bootstrap package using a tool like InstallApplications to install a base set of applications, set the Mac's background, and install the latest macOS update for the end user.
To add a bootstrap package to Fleet, we will do the following steps:
- Download or generate a package
- Sign the package
- Upload the package to Fleet
- Confirm package is uploaded
Step 1: Download or generate a package
Whether you have to download or generate a package depends on what you want to deploy using your bootstrap package:
A single client or agent, like Munki or Puppet, can usually be downloaded from the tool's GitHub repository or website. For example, you can download Munki, the Munki client on their releases page on GitHub.

Packages deployed via bootstrap need to be signed. The packages on the official Munki release page above are not signed. You will either need to sign the package yourself (see Step 2 below) or use an already signed release from MacAdmins Open Source.
To deploy custom scripts, you need to generate a package. The munkipkg tool is a popular tool for generating packages.
Verify that the package is a distribution package:
- Run the following commands to expand your package and look at the files in the expanded folder:
$ pkgutil --expand package.pkg expanded-package
$ ls expanded-package
If your package is a distribution package you should see a Distribution file.
- If you don't see a
Distributionfile, run the following command to convert your package into a distribution package.
$ productbuild --package package.pkg distrbution-package.pkg Make sure your package is a .pkg file.
Step 2: Sign the package
To sign the package we need a valid Developer ID Installer certificate:
- Login to your Apple Developer account.
- Follow Apple's instructions to create a Developer ID Installer certificate.
During step 3 in Apple's instructions, make sure you choose "Developer ID Installer." You'll need this kind of certificate to sign the package.
Confirm that certificate is installed on your Mac by opening the Keychain Access application. You should see your certificate in the Certificates tab.
- Run the following command in the Terminal application to sign your package with your Developer ID certificate:
$ productsign --sign "Developer ID Installer: Your name (Serial number)" /path/to/package.pkg /path/to/signed-package.pkgYou might be prompted to enter the password for your local account.
Confirm that your package is signed by running the following command:
$ pkgutil --check-signature /path/to/signed-package.pkgIn the output you should see that your package has a "signed" status.
Step 3: Upload the package to Fleet
Head to the Controls > Setup experience > Bootstrap package page.
Choose which team you want to add the bootstrap package to by selecting the desired team in the teams dropdown in the upper left corner.
Select Upload and choose your bootstrap package.
Install software
You can install software during first time macOS, iOS, iPadOS, Android, and Windows and Linux setup.
Currently, for macOS hosts, software is only installed on hosts that automatically enroll to Fleet via Apple Business Manager (ABM). For iOS and iPadOS hosts, software is only installed on hosts that enroll via ABM and hosts that manually enroll via the /enroll link (profile-based device enrollment).
Add setup experience software:
Click on the Controls tab in the main navigation bar, then Setup experience > 4. Install software.
Click Add software, then select or search for the software you want installed during the setup experience.
Press Save to save your selection.
To see the end user experience on iOS/iPadOS, check out the iOS video and iPadOS video
Currently, if Android software is deleted from Setup experience > Install software, it still gets installed when Android hosts enroll. We'll improve this in #36859.
Retries
For macOS, Windows, and Linux hosts, software installs are automatically attempted up to 3 times (1 initial attempt + 2 retries) to handle intermittent network issues or temporary failures. When Fleet retries, IT admins can see error messages for all attempts in the Host details > Activity card. The end user only sees an error message if the third, and final, attempt fails.
Retries only happen for custom packages and Fleet-maintained apps. For App Store (VPP) apps, the MDM command to install the app is sent once and either succeeds or fails.
Stop setup on failed software installs
For macOS hosts, you can configure the setup experience to stop if any software item fails to install:
In Controls > Setup experience > Install software > macOS, select Show advanced options.
Check the Cancel setup if software install fails checkbox.
Select Save.
When this feature is enabled, any failed software will immediately end the setup experience and instruct the end user to restart their Mac:
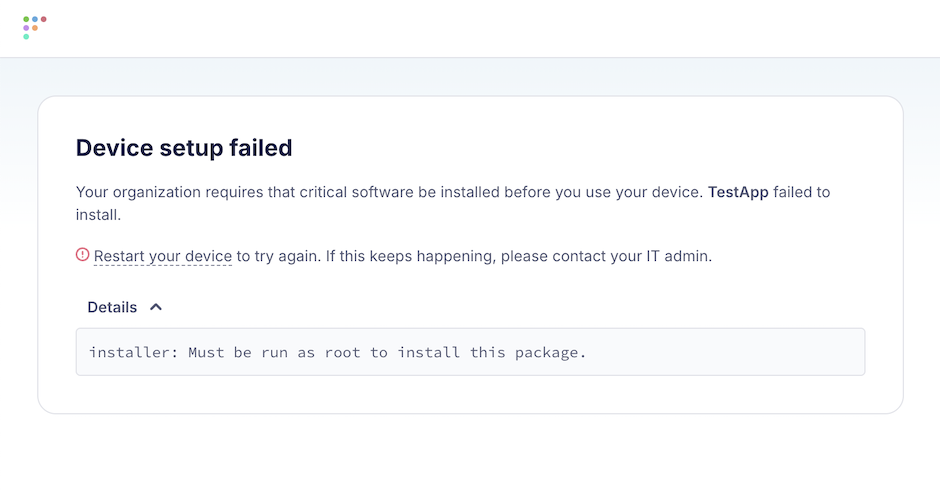
End users won't continue through setup experience unless they press Command (⌘) + Shift + X.
Run script
To configure a script to run during setup experience:
Click on the Controls tab in the main navigation bar, then Setup experience > 5. Run script.
Click Upload and select a script (.sh file) from the file picker modal.
To replace the Fleet logo with your organization's logo:
Go to Settings > Organization settings > Organization info.
Add URLs to your logos in the Organization avatar URL (for dark backgrounds) and Organization avatar URL (for light backgrounds) fields.
Press Save.
See configuration documentation for recommended logo sizes.
The setup experience script always runs after setup experience software is installed. Currently, software that automatically installs and scripts that automatically run are also installed and run during Setup Assistant but won't appear in the window. Automatic software and scripts may run before or after the setup experience software/script. They aren't installed/run in any particular order.
Exiting the setup experience
The Fleet setup experience for macOS will exit if any of the following occurs:
- All setup steps complete successfully.
- All setup steps complete, including failed installs or script runs, with the "Cancel setup if software install fails" option not enabled (see "Blocking setup on failed software installs").
- The user presses Command (⌘) + Shift + X at any time during the setup process.
Setup Assistant
When an end user unboxes their new Apple device, or starts up a freshly wiped device, they're presented with the Setup Assistant. Here they see panes that allow them to configure accessibility, appearance, and more.
In Fleet, you can customize the Setup Assistant by using an automatic enrollment profile. Fleet uses these options by default. See all options in the Apple docs.
To customize the Setup Assistant, we will do the following steps:
Create an automatic enrollment profile.
Upload the profile to Fleet.
Test the custom Setup Assistant.
Step 1: Create an automatic enrollment profile
Download Fleet's example automatic enrollment profile by navigating to the example and clicking the Download icon.
Open the automatic enrollment profile and replace the
profile_namekey with your organization's name.View the list of Setup Assistant properties (panes) here in Apple's Device Management documentation and choose which panes to hide from your end users.
In your automatic enrollment profile, edit the
skip_setup_itemsarray so that it includes the panes you want to hide.
You can modify properties other than
skip_setup_items. See Apple's profile documentation for valid fields. Theawait_device_configuredoption is always set totrueto allow Fleet to take actions like running scripts and installing software packages during the enrollment process. If you'd like to release devices manually, you can check the "Release device manually" option in Setup experience > Setup Assistant > Show advanced options.
Step 2: Upload the profile to Fleet
Head to the Controls > Setup experience > Setup Assistant page.
Choose which team you want to add the profile to by selecting the desired team in the teams dropdown in the upper left corner.
Select Add profile and choose your profile package.
Step 3: Test the custom Setup Assistant
Testing requires a test Mac that is present in your Apple Business Manager (ABM) account. We will wipe this Mac and use it to test the custom Setup Assistant.
Wipe the test Mac by selecting the Apple icon in top left corner of the screen, selecting System Settings or System Preference, and searching for "Erase all content and settings." Select Erase All Content and Settings.
In Fleet, navigate to the Hosts page and find your Mac. Make sure that the host's MDM status is set to "Pending."
New Macs purchased through Apple Business Manager appear in Fleet with MDM status set to "Pending." See our automatic enrollment guide for more information.
Transfer this host to the "Workstations (canary)" team by selecting the checkbox to the left of the host and selecting Transfer at the top of the table. In the modal, choose the Workstations (canary) team and select Transfer.
Boot up your test Mac and complete the custom out-of-the-box setup experience.
Configuring via REST API
Fleet also provides a REST API for managing setup experience software and scripts programmatically. Learn more about Fleet's REST API.
Configuring via GitOps
To manage setup experience software and script using Fleet's best practice GitOps, check out the macos_setup key in the GitOps reference documentation
Advanced
Manually install fleetd
Experimental feature. This feature is undergoing rapid improvement, which may result in breaking changes to the API or configuration surface. It is not recommended for use in automated workflows.
By default, Fleet's agent (fleetd) is automatically installed during automatic enrollment (ADE) on macOS hosts. To deploy a custom fleetd agent on macOS hosts that automatically enroll, you can use a bootstrap package.
How to deploy a custom fleetd:
Generate your fleetd package by running the command
fleetctl package, ensuring you do not use the--use-system-configurationflag.Add fleetd to your bootstrap package. To customize fleetd further, you can also add a script to modify fleetd's launchd template.
In Fleet, head to Controls > Setup Experience > Bootstrap package and add your bootstrap package. Make sure to check the option Install Fleet’s agent (fleetd) manually and then select Save.
Once the option to manually install Fleet's agent is checked, instead of using Install software and Run script options, include your software in the bootstrap package.
If you deploy a custom fleetd, also add the software and scripts you want to install/run during out-of-the-box macOS setup to your bootstrap package. Fleet won't install the software and run the script configured in setup experience.
swiftDialog
Fleet uses swiftDialog to show end users software install and script run status. swiftDialog is only installed on macOS hosts if there is setup experience software or a script. After setup experinece, swiftDialog stays installed.