Solutions
Device management
Remotely manage, and protect laptops and mobile devices.
Orchestration
Automate tasks across devices, from app installs to scripts.
Software management
Inventory, patch, and manage installed software.
Infrastructure as code
See every change, undo any error, repeat every success.
Extend Fleet
Integrate your favorite tools with Fleet.
Customers
Pricing
More
Device management
Remotely manage, and protect laptops and mobile devices.
Orchestration
Automate tasks across devices, from app installs to scripts.
Software management
Inventory, patch, and manage installed software.
Infrastructure as code
See every change, undo any error, repeat every success.
Extend Fleet
Integrate your favorite tools with Fleet.
Deploy Fleet on CentOS
{{articleSubtitle}}
Mike Arpaia
Deploy Fleet on CentOS
{{articleSubtitle}}
Mike Arpaia
Deploy Fleet on CentOS
Archived. While still usable, this guide has not been updated recently. See the Deploy Fleet docs for supported deployment methods.

Updated on December 2, 2020, by Noah Talerman.
In this guide, we're going to install Fleet and all of its application dependencies on a CentOS 7.1 server. Once we have Fleet up and running, we're going to install osquery on that same CentOS 7.1 host and enroll it in Fleet. This should give you a good understanding of both how to install Fleet as well as how to install and configure osquery such that it can communicate with Fleet.
Setting up a host
If you don't have a CentOS host readily available, Fleet recommends using Vagrant for this guide. You can find installation instructions on Vagrant's downloads page.
Once you have installed Vagrant, run the following to create a Vagrant box, start it, and log into it:
echo 'Vagrant.configure("2") do |config|
  config.vm.box = "bento/centos-7.1"
  config.vm.network "forwarded_port", guest: 8080, host: 8080
end' > Vagrantfile
vagrant up
vagrant ssh
Installing Fleet
To install Fleet, download the latest release from GitHub. The binary is in an archive that uses this naming convention, including the current version: fleet_<version>_linux.tar.gz.
Once the file is downloaded, extract the Fleet binary from the archive and copy it in to your desired location.
For example:
> tar -xf fleet_<version>_linux.tar.gz
> sudo cp fleet_<version>_linux/fleet /usr/bin/
> /usr/bin/fleet version
fleet version <version>
Installing and configuring dependencies
MySQL
To install the MySQL server files, run the following:
wget https://repo.mysql.com/mysql57-community-release-el7.rpm
sudo rpm -i mysql57-community-release-el7.rpm
sudo yum update
sudo yum install mysql-server
To start the MySQL service:
sudo systemctl start mysqldLet's set a password for the MySQL root user.
MySQL creates an initial temporary root password which you can find in /var/log/mysqld.log you will need this password to change the root password.
Connect to MySQL
mysql -u root -pWhen prompted enter in the temporary password from /var/log/mysqld.log
Change root password, in this case we will use toor?Fl33t as default password validation requires a more complex password.
For MySQL 5.7.6 and newer, use the following command:
mysql> ALTER USER "root"@"localhost" IDENTIFIED BY "toor?Fl33t";For MySQL 5.7.5 and older, use:
mysql> SET PASSWORD FOR "root"@"localhost" = PASSWORD("toor?Fl33t");Now issue the command
mysql> flush privileges;And exit MySQL
mysql> exitStop MySQL and start again
sudo mysqld stop
sudo systemctl start mysqld
It's also worth creating a MySQL database for us to use at this point. Run the following to create the fleet database in MySQL. Note that you will be prompted for the password you created above.
echo 'CREATE DATABASE fleet;' | mysql -u root -pRedis
To install the Redis server files, run the following:
sudo rpm -Uvh https://archives.fedoraproject.org/pub/archive/epel/6/i386/epel-release-6-8.noarch.rpm
sudo yum install redis
To start the Redis server in the background, you can run the following:
sudo service redis startRunning the Fleet server
Now that we have installed Fleet, MySQL, and Redis, we are ready to launch Fleet! First, we must "prepare" the database. We do this via fleet prepare db:
/usr/bin/fleet prepare db \
  --mysql_address=127.0.0.1:3306 \
  --mysql_database=fleet \
  --mysql_username=root \
  --mysql_password=toor?Fl33t
The output should look like:
Migrations completed.Before we can run the server, we need to generate some TLS keying material. If you already have tooling for generating valid TLS certificates, then you are encouraged to use that instead. You will need a TLS certificate and key for running the Fleet server. If you'd like to generate self-signed certificates, you can do this via (replace SERVER_NAME with your server FQDN):
openssl req -x509 -newkey rsa:4096 -sha256 -days 3650 -nodes \
  -keyout /tmp/server.key -out /tmp/server.cert -subj "/CN=SERVER_NAME” \
  -addext "subjectAltName=DNS:SERVER_NAME”
You should now have two new files in /tmp:
/tmp/server.cert/tmp/server.key
Now we are ready to run the server! We do this via fleet serve:
/usr/bin/fleet serve \
  --mysql_address=127.0.0.1:3306 \
  --mysql_database=fleet \
  --mysql_username=root \
  --mysql_password=toor \
  --redis_address=127.0.0.1:6379 \
  --server_cert=/tmp/server.cert \
  --server_key=/tmp/server.key \
  --logging_json
Now, if you go to https://localhost:8080 in your local browser, you should be redirected to https://localhost:8080/setup where you can create your first Fleet user account.
Running Fleet with systemd
See Running with systemd for documentation on running fleet as a background process and managing the fleet server logs.
Installing and running osquery
Note that this whole process is outlined in more detail in the Adding Hosts To Fleet document. The steps are repeated here for the sake of a continuous tutorial.
To install osquery on CentOS, you can run the following:
sudo rpm -ivh https://osquery-packages.s3.amazonaws.com/centos7/noarch/osquery-s3-centos7-repo-1-0.0.noarch.rpm
sudo yum install osquery
You will need to set the osquery enroll secret and osquery server certificate. If you head over to the manage hosts page on your Fleet instance (which should be https://localhost:8080/hosts/manage), you should be able to click "Add New Hosts" and see a modal like the following:
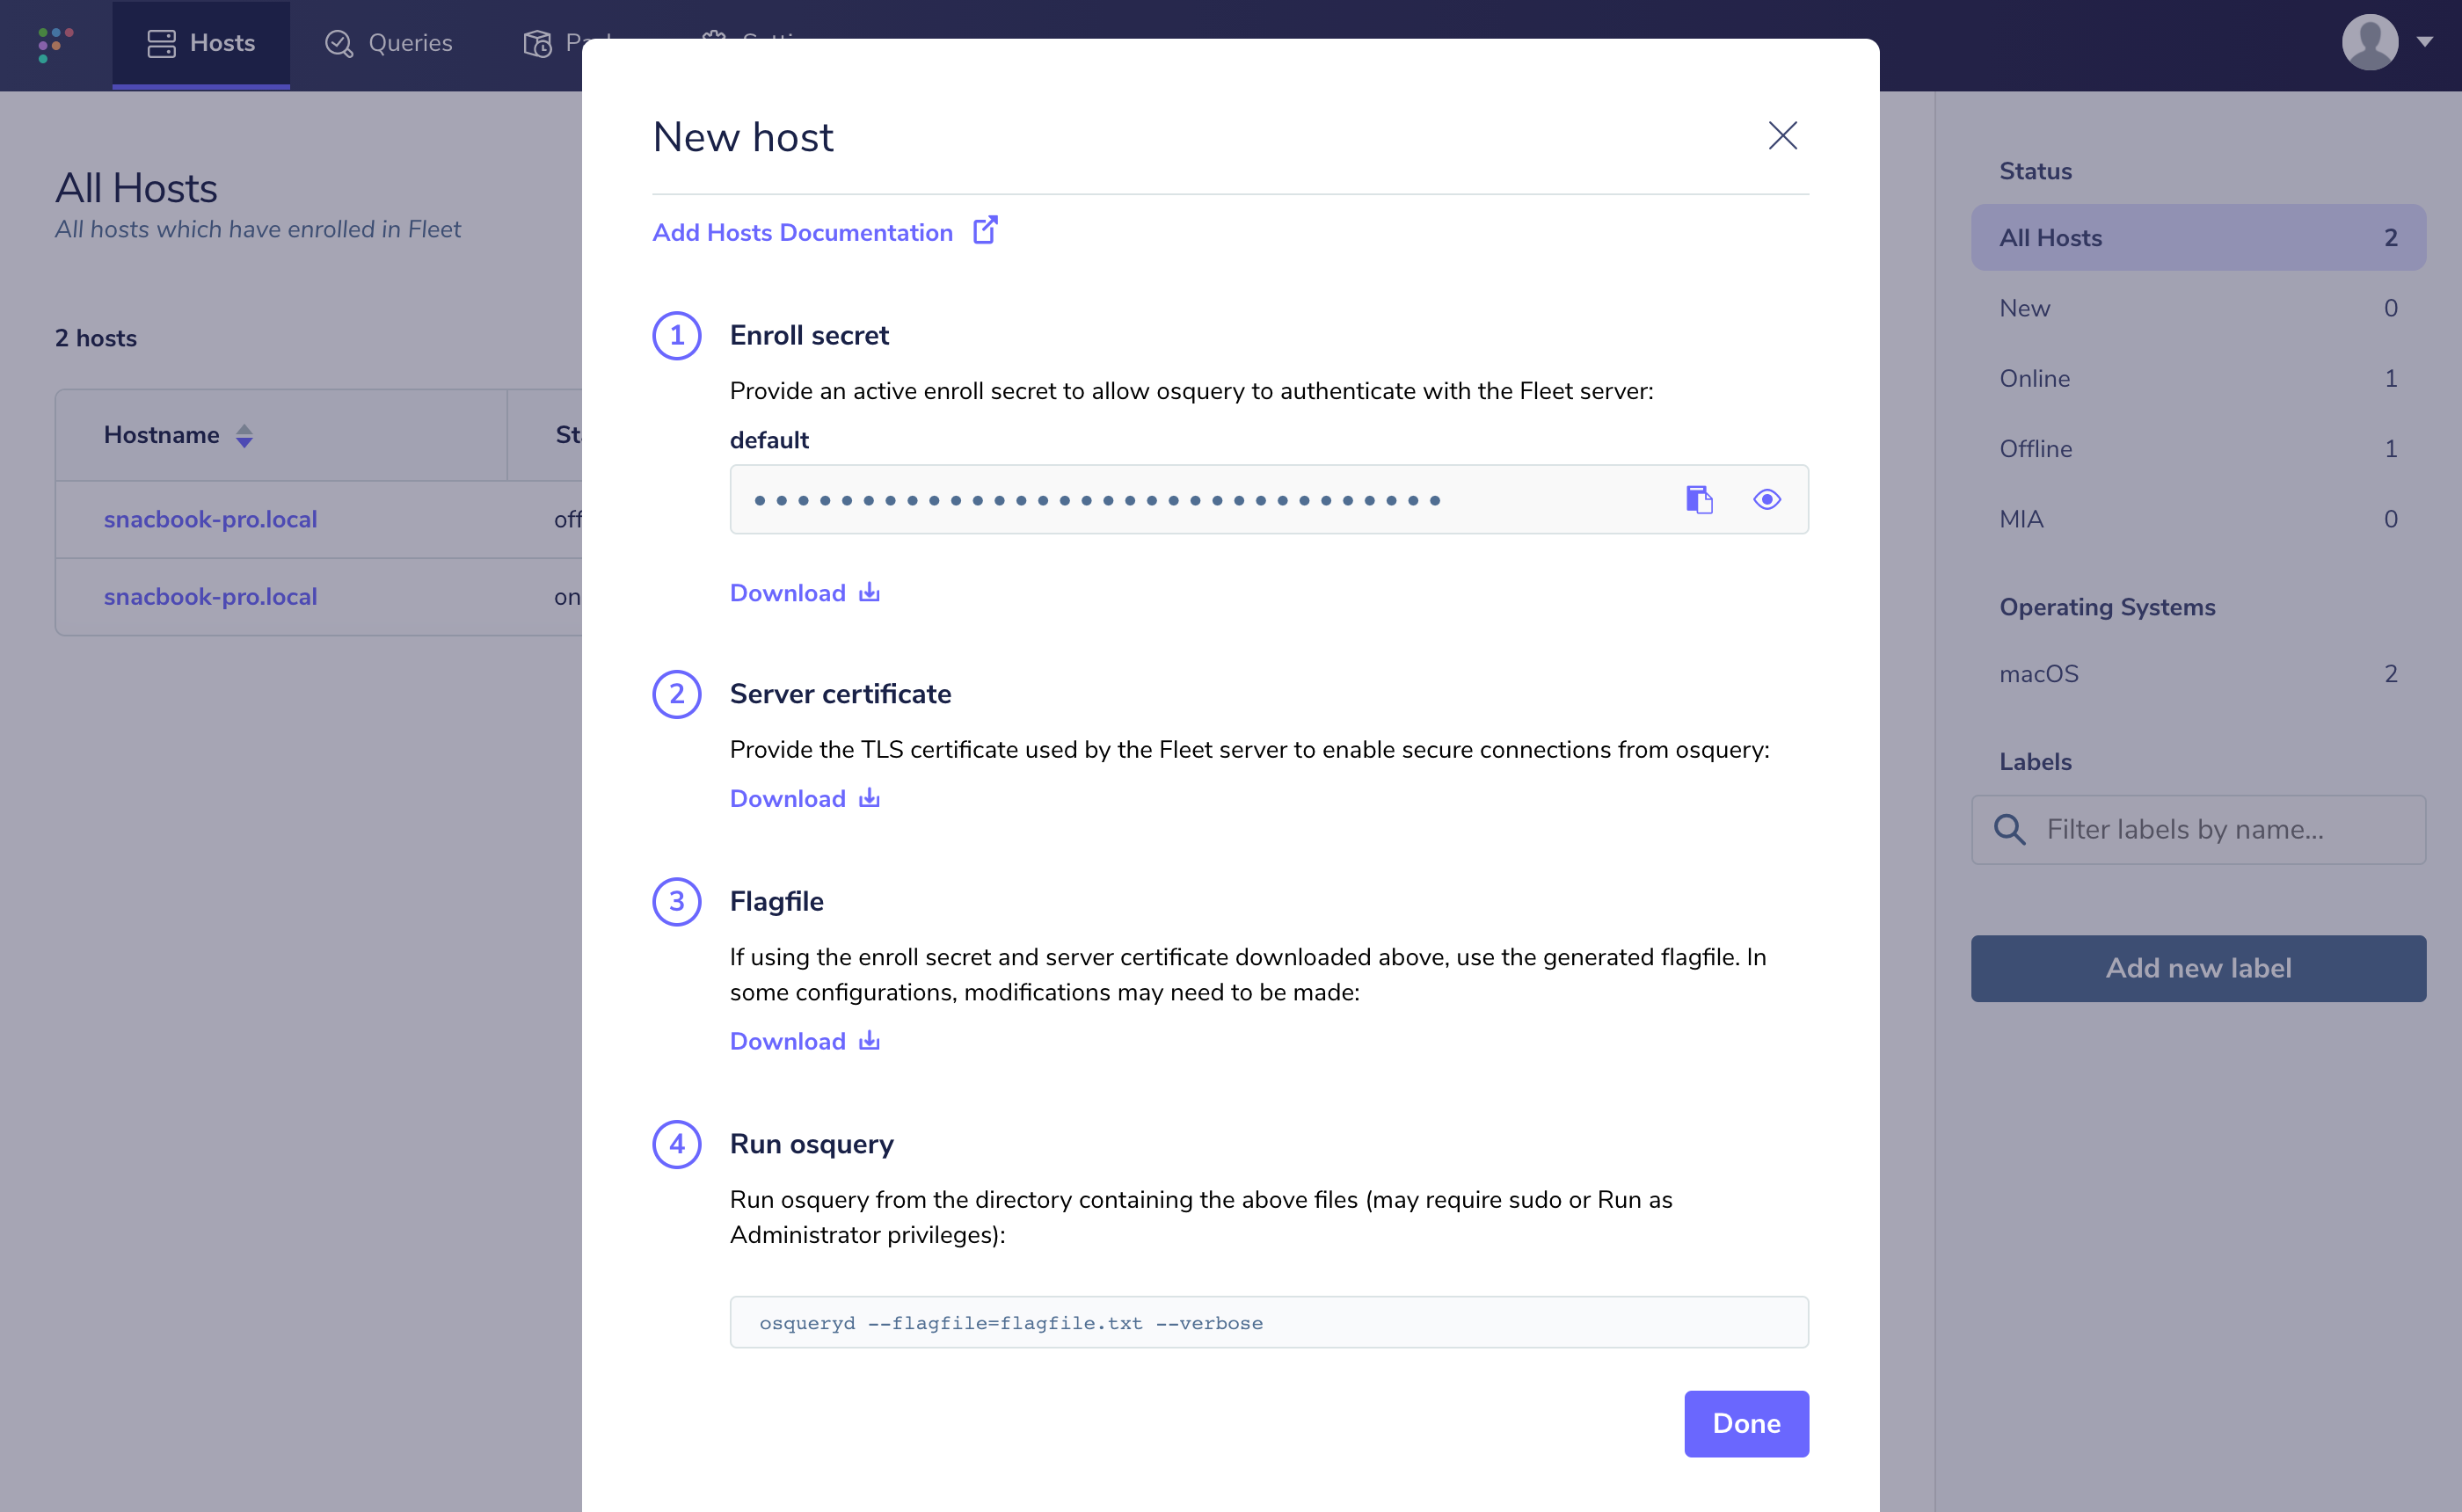
If you select "Fetch Fleet Certificate", your browser will download the appropriate file to your downloads directory (to a file probably called localhost-8080.pem). Copy this file to your CentOS host at /var/osquery/server.pem.
You can also select "Reveal Secret" on that modal and the enrollment secret for your Fleet instance will be revealed. Copy that text and create a file with its contents:
echo 'LQWzGg9+/yaxxcBUMY7VruDGsJRYULw8' | sudo tee /var/osquery/enroll_secretNow you're ready to run the osqueryd binary:
sudo /usr/bin/osqueryd \
  --enroll_secret_path=/var/osquery/enroll_secret \
  --tls_server_certs=/var/osquery/server.pem \
  --tls_hostname=localhost:8080 \
  --host_identifier=instance \
  --enroll_tls_endpoint=/api/osquery/enroll \
  --config_plugin=tls \
  --config_tls_endpoint=/api/osquery/config \
  --config_refresh=10 \
  --disable_distributed=false \
  --distributed_plugin=tls \
  --distributed_interval=3 \
  --distributed_tls_max_attempts=3 \
  --distributed_tls_read_endpoint=/api/osquery/distributed/read \
  --distributed_tls_write_endpoint=/api/osquery/distributed/write \
  --logger_plugin=tls \
  --logger_tls_endpoint=/api/osquery/log \
  --logger_tls_period=10
If you go back to https://localhost:8080/hosts/manage, you should have a host successfully enrolled in Fleet!