Solutions
Device management
Remotely manage, and protect laptops and mobile devices.
Orchestration
Automate tasks across devices, from app installs to scripts.
Software management
Inventory, patch, and manage installed software.
Infrastructure as code
See every change, undo any error, repeat every success.
Extend Fleet
Integrate your favorite tools with Fleet.
Customers
Pricing
More
Device management
Remotely manage, and protect laptops and mobile devices.
Orchestration
Automate tasks across devices, from app installs to scripts.
Software management
Inventory, patch, and manage installed software.
Infrastructure as code
See every change, undo any error, repeat every success.
Extend Fleet
Integrate your favorite tools with Fleet.
Deploying Platform SSO with Microsoft Entra ID
{{articleSubtitle}}
Dale Ribeiro
Deploying Platform SSO with Microsoft Entra ID
{{articleSubtitle}}
Dale Ribeiro
Deploying Entra ID Platform SSO with Fleet
Apple’s Platform Single Sign-on (Platform SSO), introduced at WWDC22 alongside macOS Ventura, iOS 17, and iPadOS 17, enables users to sign in to their identity provider credentials once and automatically access apps and websites that require authentication through an IdP.
This guide details how to deploy Microsoft Entra ID's macOS Platform SSO extension to your Fleet macOS hosts.
Why use Platform SSO?
If your Identity Provider (IdP) supports Platform Single Sign-on, deploying it in your environment offers a great and secure sign-in experience for your users.
Rather than your users having to enter credentials each time they sign in to an app protected by Entra ID, the Platform SSO extension will automatically perform the authentication using a Secure Enclave-backed key.
This speeds up the authentication process for your employees and is more resistant to phishing than a traditional username and password.
Requirements
- macOS 13 or later
- Microsoft Entra ID
- A Fleet server with Apple MDM turned on
- Microsoft’s Company Portal app (version 5.2404.0 or greater)
- iMazing Profile Editor (optional)
- If using Google Chrome, Microsoft’s Single Sign On Extension
Deploy the Company Portal app
Upload the Company Portal app to your Fleet server
On your Fleet server, select the team you want to deploy Platform SSO to. Navigate to Software > Add software > Custom package > Choose file.
Select the CompanyPortal-Installer.pkg file on your computer, then click the Add software button.
Choose if you want to manually install the Company Portal app on your hosts or have Fleet automatically do it. If you select Automatic, Fleet will create a policy to detect which hosts do not have the Company Portal app and install it. If you select Manual, you'll need to trigger the install from the Software tab on individual hosts from the host's details page .
Next, let’s build the configuration profile that enables the Company Portal Platform SSO extension.
Building the Platform SSO configuration profile
Once your hosts have the Company Portal app installed, you’ll need to deploy a configuration profile that enables the Microsoft Enterprise SSO plug-in.
On your Mac, open iMazing Profile Editor. In the General domain, select a name for your Platform SSO profile in the Payload Display Name field. If you wish, you can modify the identifier and UUID fields to meet your organization’s naming standards, but it’s also fine to leave them as they are.
Next, find the Extensible Single Sign-On payload from the list of available system domains, and click the + Add Configuration Payload button.
Before we start to add values to the payload, double-check to make sure that only macOS is selected in the toolbar at the top of the iMazing window. Some of the keys we’ll be using are macOS only and won’t appear if iOS, tvOS, or watchOS are also selected.
Note: This profile uses the
SecureEnclaveKeyauthentication method, which uses a Secure Enclave-backed key to authenticate with the IdP instead of the user’s local account password. Secure Enclave is the default key storage for all new device registrations since august 2025 .
Enter the following values for the specified keys:
Extension identifier: com.microsoft.CompanyPortalMac.ssoextension
Type: Redirect
Team identifier: UBF8T346G9
URLs: https://login.microsoftonline.com
https://login.microsoft.com
https://sts.windows.net
Screen locked behavior: Do Not Handle
Authentication method: User Secure Enclave Key
Platform SSO authentication method: UserSecureEnclaveKey
Use shared device keys: Checked
Account name: preferred_username
Full name: name
The finalized profile should look like this:
<?xml version="1.0" encoding="UTF-8"?>
<!DOCTYPE plist PUBLIC "-//Apple//DTD PLIST 1.0//EN" "http://www.apple.com/DTDs/PropertyList-1.0.dtd">
<plist version="1.0">
<dict>
    <key>PayloadContent</key>
    <array>
        <dict>
            <key>AuthenticationMethod</key>
            <string>UserSecureEnclaveKey</string>
            <key>ExtensionIdentifier</key>
            <string>com.microsoft.CompanyPortalMac.ssoextension</string>
            <key>PayloadDisplayName</key>
            <string>Extensible Single Sign-On</string>
            <key>PayloadIdentifier</key>
            <string>com.apple.extensiblesso.4D68D4CF-1250-4FF4-AFFB-1176DB539C49</string>
            <key>PayloadType</key>
            <string>com.apple.extensiblesso</string>
            <key>PayloadUUID</key>
            <string>4D68D4CF-1250-4FF4-AFFB-1176DB539C49</string>
            <key>PayloadVersion</key>
            <integer>1</integer>
            <key>PlatformSSO</key>
            <dict>
                <key>AuthenticationMethod</key>
                <string>UserSecureEnclaveKey</string>
                <key>TokenToUserMapping</key>
                <dict>
                    <key>AccountName</key>
                    <string>preferred_username</string>
                    <key>FullName</key>
                    <string>name</string>
                </dict>
                <key>UseSharedDeviceKeys</key>
                <true/>
            </dict>
            <key>ScreenLockedBehavior</key>
            <string>DoNotHandle</string>
            <key>TeamIdentifier</key>
            <string>UBF8T346G9</string>
            <key>Type</key>
            <string>Redirect</string>
            <key>URLs</key>
            <array>
                <string>https://login.microsoftonline.com</string>
                <string>https://login.microsoft.com</string>
                <string>https://sts.windows.net</string>
            </array>
        </dict>
    </array>
    <key>PayloadDisplayName</key>
    <string>PlatformSSO</string>
    <key>PayloadIdentifier</key>
    <string>com.fleetdm.platformsso.652B07D0-2E08-45CE-9423-1FCAFFAEC390</string>
    <key>PayloadType</key>
    <string>Configuration</string>
    <key>PayloadUUID</key>
    <string>652B07D0-2E08-45CE-9423-1FCAFFAEC390</string>
    <key>PayloadVersion</key>
    <integer>1</integer>
</dict>
</plist>
Save the profile to your computer so you can upload it to Fleet in the next section. I named mine platform-sso-settings.mobileconfig. If you wish, you can sign the profile before uploading it, but this is not required.
Deploy the configuration profile to your hosts
Now that we have a configuration profile with our desired settings, we can upload it to Fleet to deploy it to our hosts and activate the Platform SSO extension.
On your Fleet server, select the team you want to deploy Platform SSO to. Navigate to Controls > OS Settings > Custom settings. Click the Add profile button, then find the platform-sso-settings.mobileconfig profile on your computer and upload it to Fleet.
Uploading the profile to a team in Fleet will automatically deliver it to all macOS hosts enrolled in that team. If you wish to have more control over which hosts on the team receive the profile, you can use labels to target or exclude specific hosts.
End user experience
When the Company Portal app and Platform SSO configuration profile are deployed to a host, the end user will receive a notification that says Registration Required: Please register with your identity provider. You should direct your end users to interact with this notification by clicking the Register button that appears when they hover their mouse over the notification.

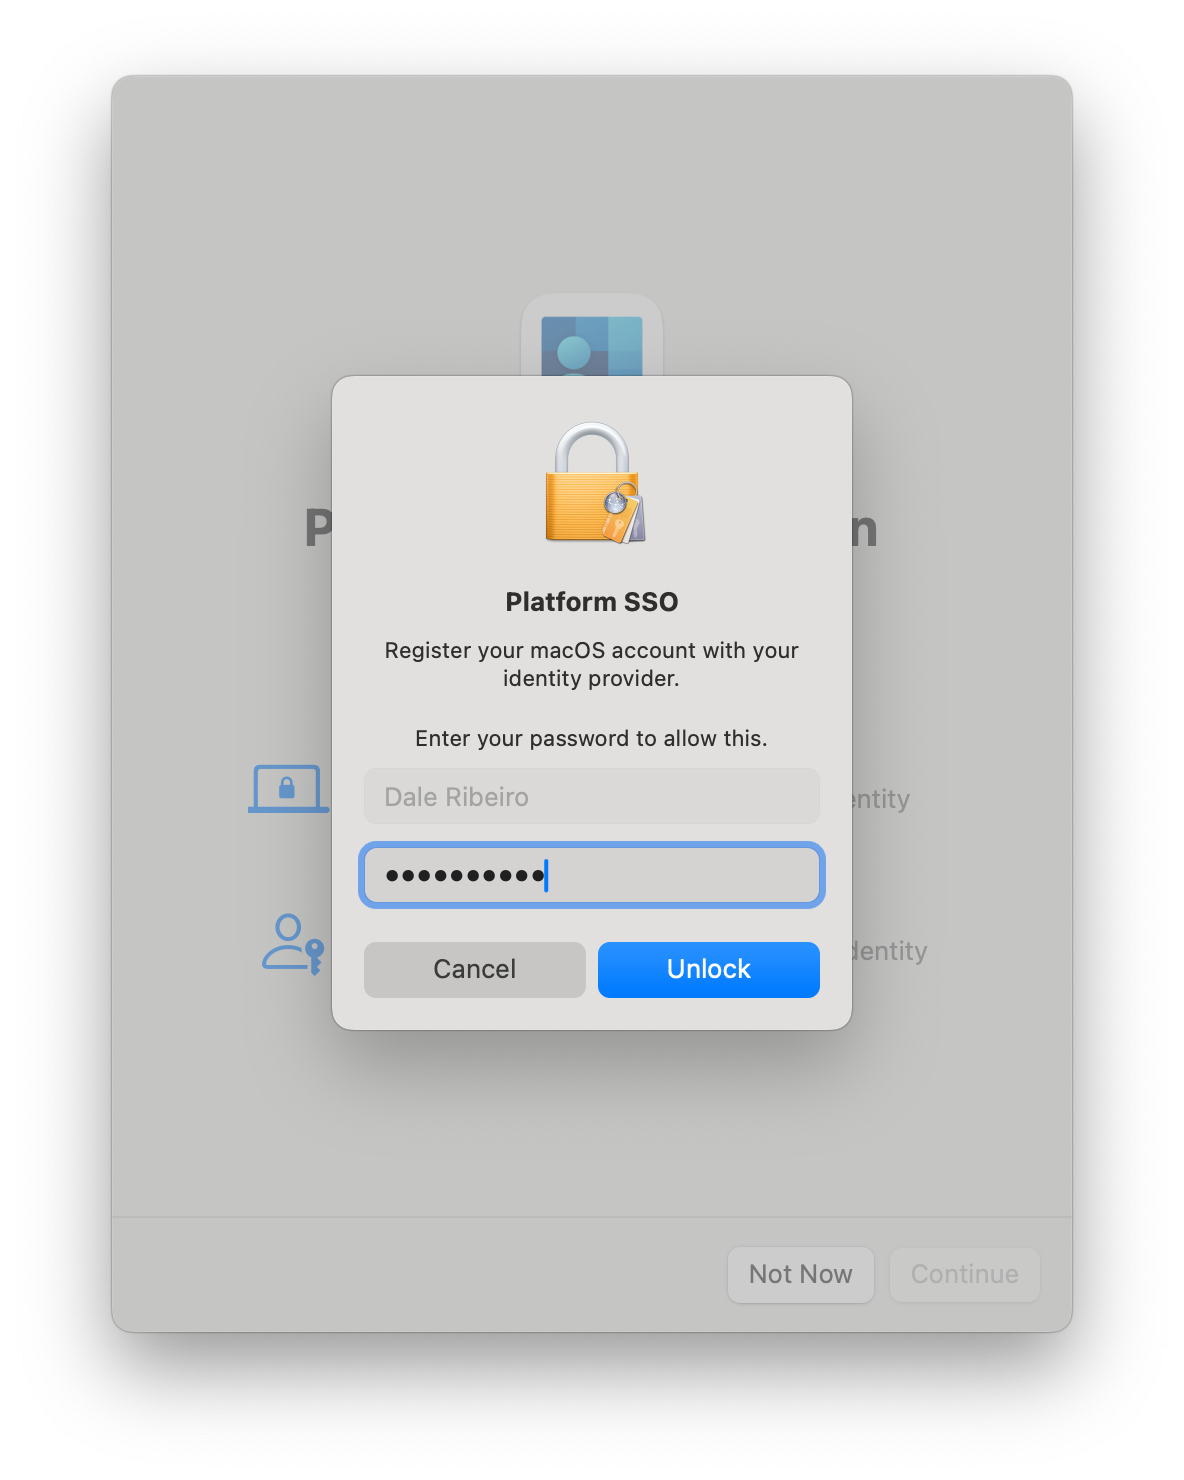
After clicking the register button in the notification, a Platform Single Sign-On Registration window will appear. After clicking Continue, the user will be prompted for the password they use to log into their Mac (this might be different than their Entra ID password).
Next, they’ll be prompted to sign into Microsoft Entra ID. This is what associates the user’s device to their Microsoft Entra ID account.
Lastly, they’ll be prompted to enable the Company Portal app to be used as a Passkey. The notification will direct them to System Settings and enable the toggle next to the Company Portal app.

Once registration is complete, the next time an employee logs into an Entra ID protected app in their web browser, the authentication will be seamless. The employee won’t be prompted for their password or be required to complete an MFA challenge. The Platform SSO extension will handle the entire authentication using the Secure Enclave-backed key.
What about password sync?
Platform SSO extensions can be configured to synchronize local account credentials with the IdP. To do this, you'll need to change the AuthenticationMethod keys in your configuration profile to Password. After the end user registers with the Company Portal app, their local account password will change to match their Entra ID password.
Keep in mind that when this method is used, authentication to Entra ID protected apps won't be handled by the Secure Enclave-backed key.